Azure DevOps Integration Guide for Specifai
This guide explains how to integrate the Specifai solution with Azure DevOps using Personal Access Tokens (PAT). Follow these steps to create a PAT, configure permissions, and set up the integration for seamless work item synchronization.
Step 1: Create a Personal Access Token in Azure DevOps
-
Access Your Azure DevOps Organization:
- Open a web browser and navigate to your Azure DevOps organization (e.g.,
https://dev.azure.com/{your-organization}). - Sign in with your Azure DevOps credentials.
- Open a web browser and navigate to your Azure DevOps organization (e.g.,
-
Navigate to Personal Access Tokens:
- Click on your profile picture in the top-right corner.
- Select Personal access tokens from the dropdown menu.
- Click + New Token to create a new PAT.
-
Configure the Token:
- Enter a Name for the token, such as "Specifai Integration Token."
- Set the Expiration date (recommended: 1 year or custom date based on your security policies).
- Select the Organization where your projects are located.
Step 2: Configure Scopes and Permissions
-
Select Custom Defined Scopes:
- Choose Custom defined to specify the exact permissions needed.
-
Add Required Scopes:
- Work Items: Select Read & write to allow reading and creating/updating work items.
- Project and team: Select Read to access project information.
-
Create the Token:
- Click Create to generate the Personal Access Token.
- Important: Copy the token immediately and store it securely. You won't be able to see it again.
Step 3: Identify Your Organization and Project Details
-
Find Your Organization Name:
- Your organization name is visible in the URL:
https://dev.azure.com/{organization-name} - Example: If your URL is
https://dev.azure.com/contoso, your organization name iscontoso.
- Your organization name is visible in the URL:
-
Identify Your Project Name:
- Navigate to your Azure DevOps project.
- The project name is displayed in the breadcrumb navigation and URL.
- Example:
https://dev.azure.com/contoso/MyProject- the project name isMyProject.
Step 4: Configure Work Item Types (Optional)
Specifai supports mapping between its document types and Azure DevOps work item types. The default mapping is:
- PRD (Product Requirements Document) → Feature
- User Story → Platform Feature
- Task → User Story
If your Azure DevOps project uses different work item types, you can configure custom mappings in the integration settings.
Step 5: Set Up the Integration in Specifai
-
Open the Integration Page:
- Launch the Specifai application and navigate to your solution.
- Go to Solution → Integration page.

-
Enter the Azure DevOps Configuration:
- Provide the following information in the Azure DevOps Integration section:
- Organization: Enter your Azure DevOps organization name (without the URL).
- Project Name: Enter the exact project name from Azure DevOps.
- Personal Access Token: Paste the PAT you created in Step 1.
- Provide the following information in the Azure DevOps Integration section:
-
Configure Work Item Type Mapping (Optional):
- If your project uses custom work item types, configure the mapping:
- PRD Maps To: Default is "Feature"
- User Story Maps To: Default is "Platform Feature"
- Task Maps To: Default is "User Story"
- If your project uses custom work item types, configure the mapping:
-
Verify the Configuration:
- Ensure all fields are correctly filled.
- The organization name should match exactly (case-sensitive).
- The project name should match the Azure DevOps project name exactly.
-
Test & Save the Configuration:
- Click Test Connection to validate your credentials and configuration.
- If successful, click Save to store the configuration.
-
Successful Connection:
- If the connection is successful, you will see a confirmation message.

- If the connection is successful, you will see a confirmation message.
Step 6: Using the Azure DevOps Integration
Pull from Azure DevOps (ADO → Specifai)
-
Access the Integration Modal:
- Navigate to your solution's integration page.
- Click on Sync with Azure DevOps or the ADO integration button.
-
Select Work Items to Import:
- The system will display a hierarchical view of your Azure DevOps work items:
- Features (mapped to PRDs)
- Platform Features (mapped to User Stories)
- User Stories (mapped to Tasks)
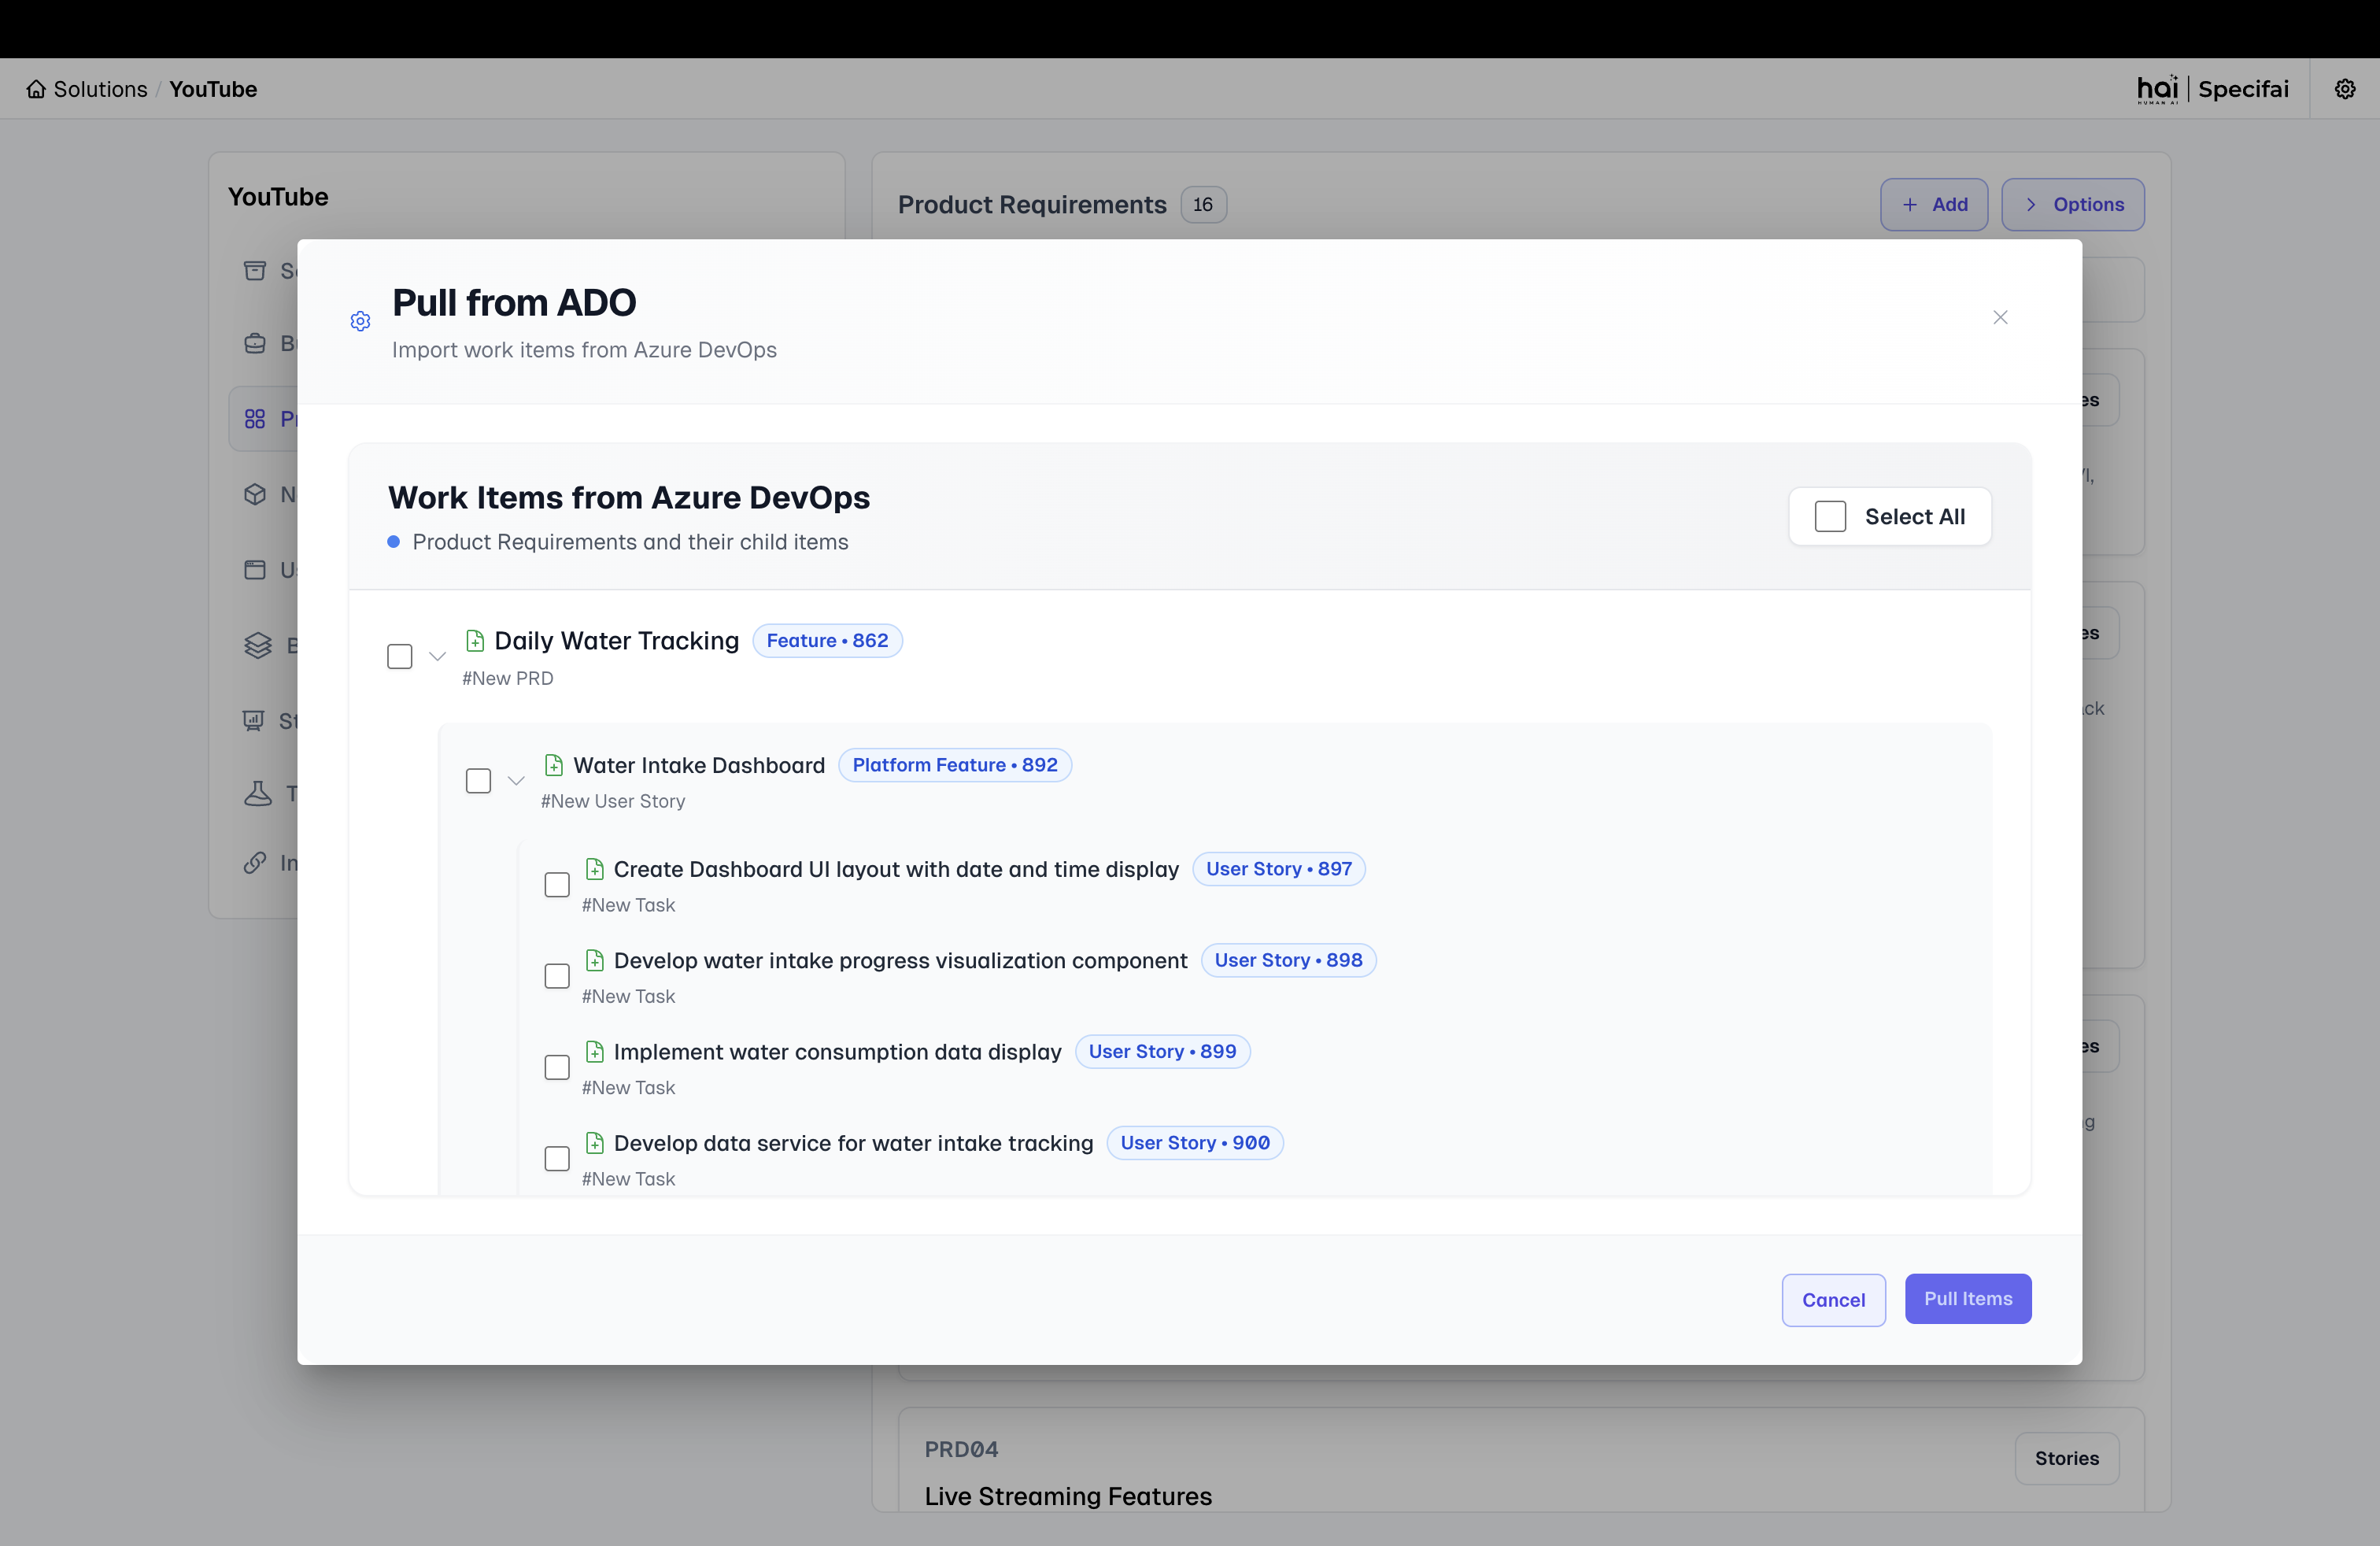 Hierarchical view for selecting Azure DevOps work items to import
 - The system will display a hierarchical view of your Azure DevOps work items:
-
Import Selected Items:
- Select the work items you want to import into Specifai.
- Click Pull from ADO to import the selected items.
- The system will create corresponding PRD, User Story, and Task files in your Specifai project.
Push to Azure DevOps (Specifai → ADO)
-
Select Items to Export:
- Choose the PRDs, User Stories, and Tasks you want to push to Azure DevOps.
- The system maintains the hierarchical relationships during export.
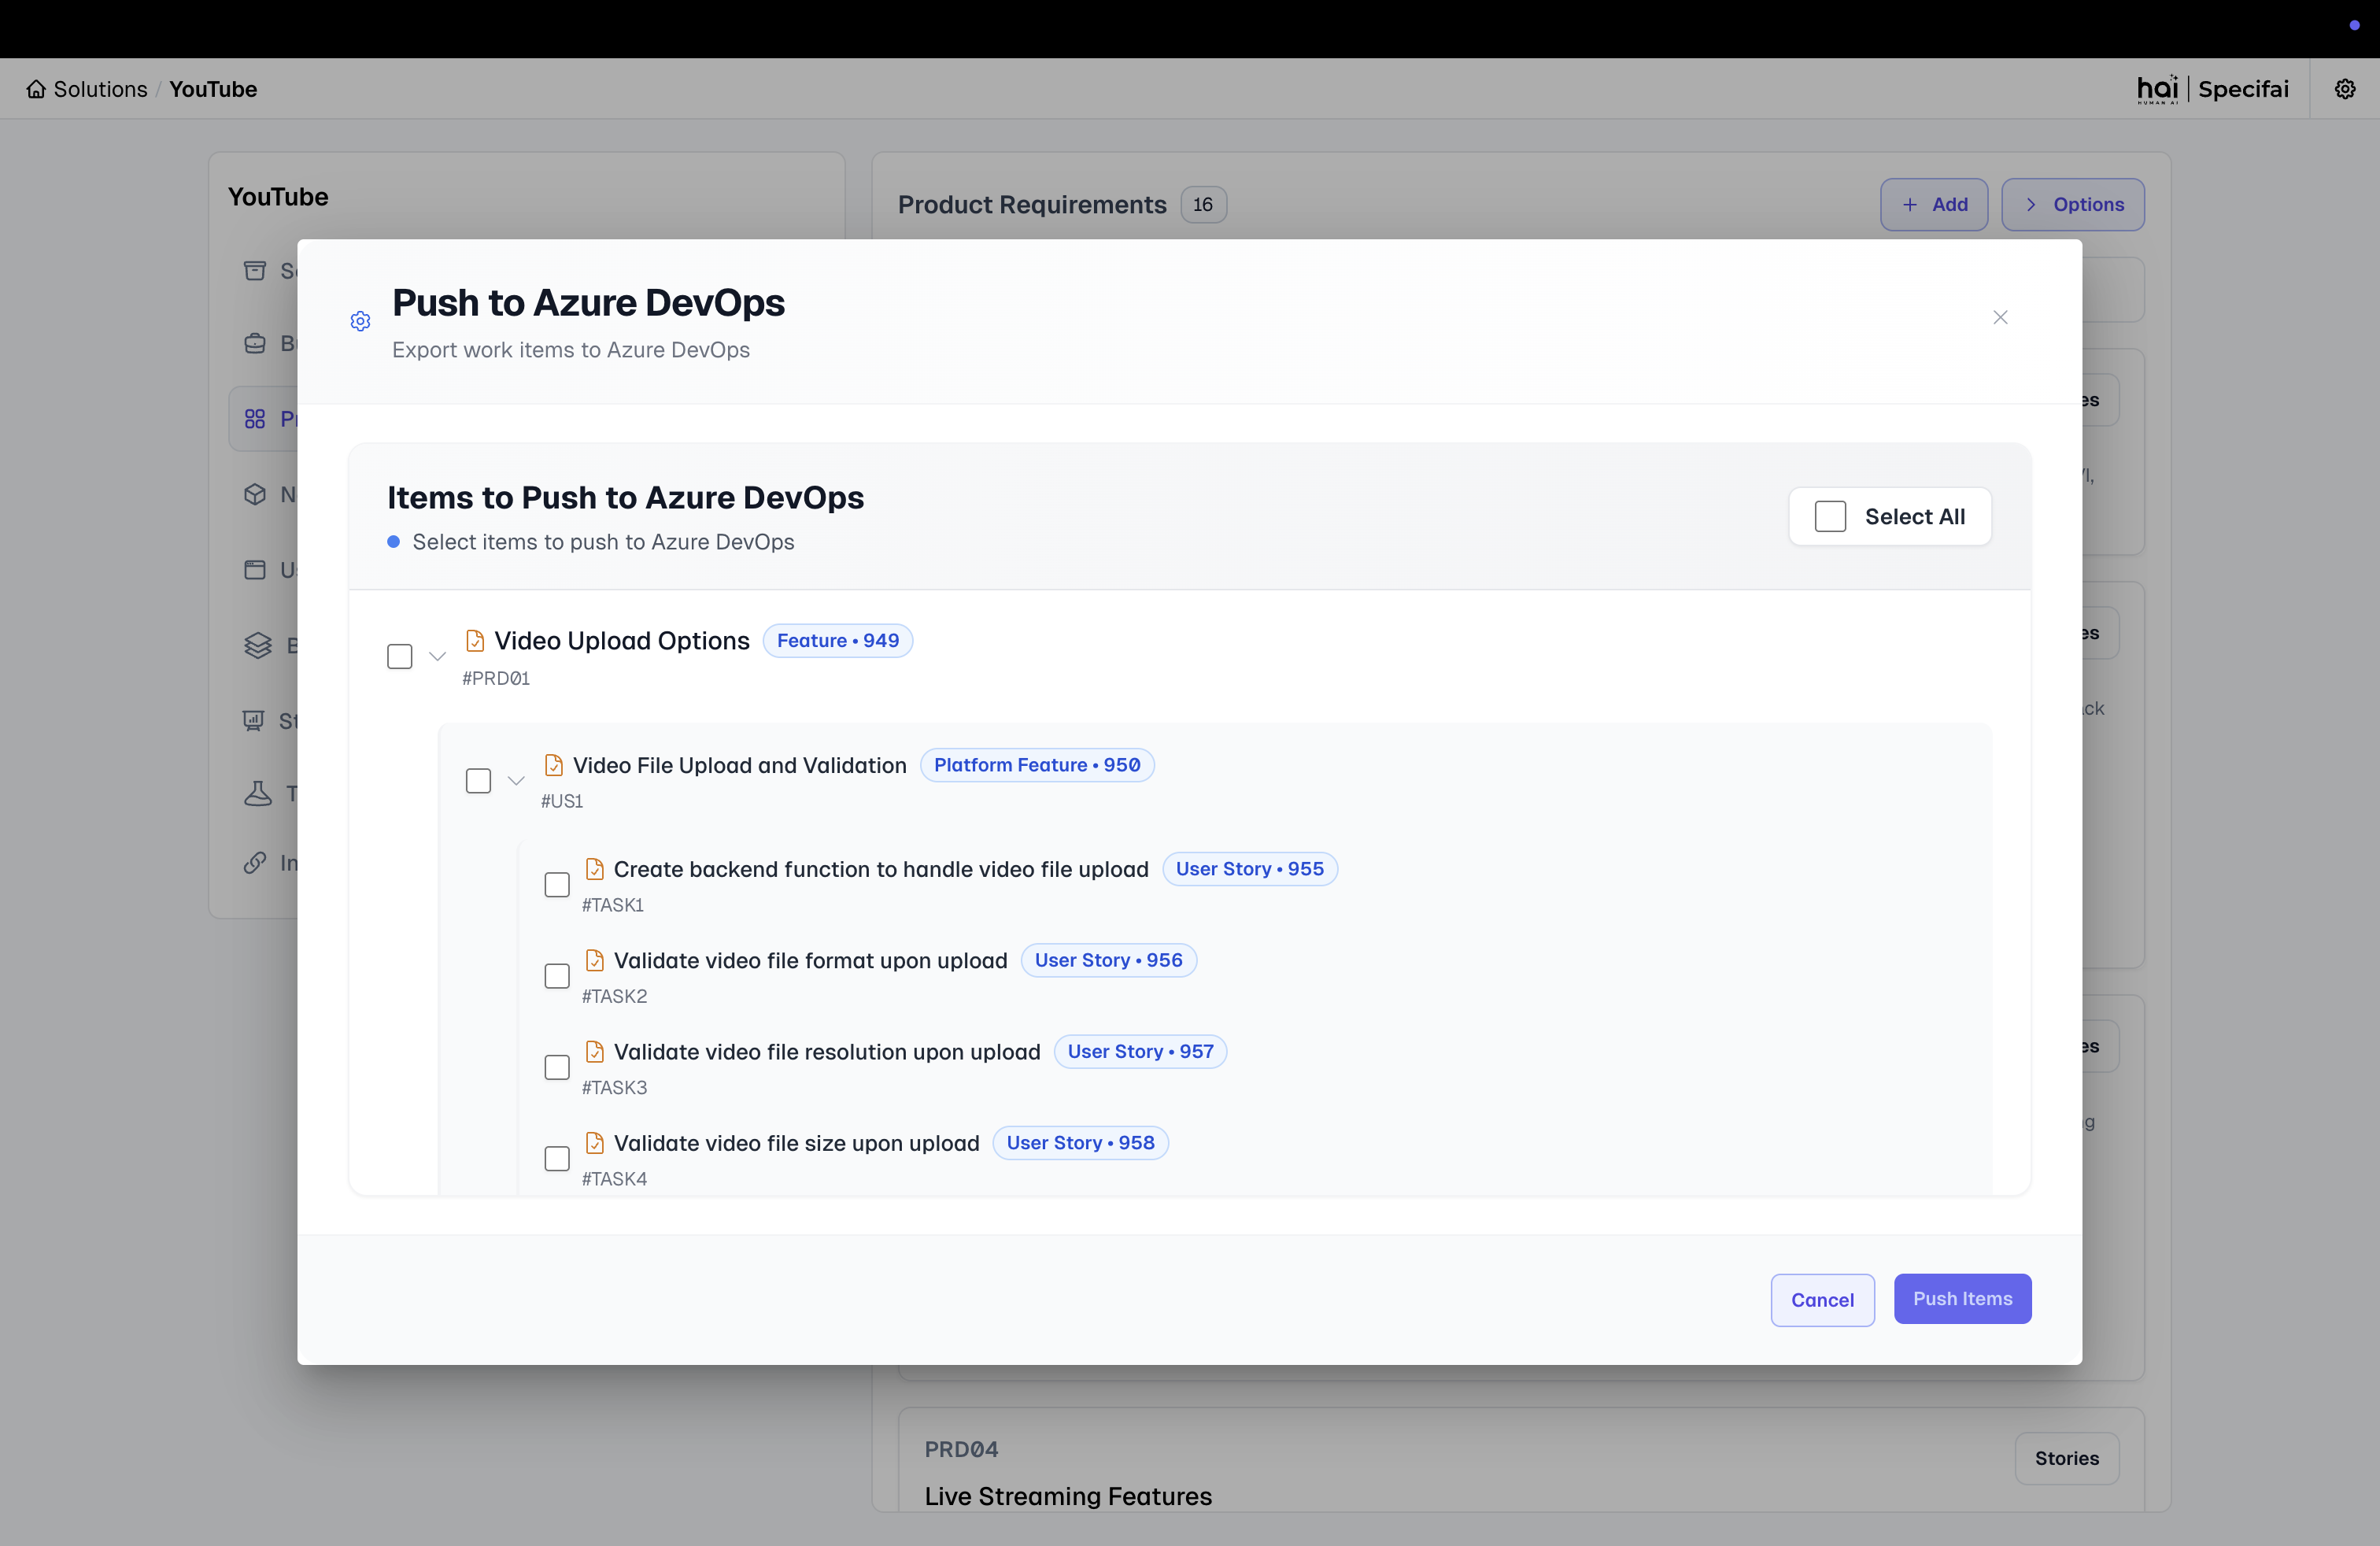 Hierarchical view for selecting Specifai documents to push to Azure DevOps
 -
Push to ADO:
- Click Push to ADO to create corresponding work items in Azure DevOps.
- The system will create Features, Platform Features, and User Stories with proper parent-child relationships.
Bidirectional Synchronization
- Update Existing Items: The integration can update existing work items in both directions.
- Maintain Relationships: Parent-child relationships are preserved during synchronization.
- Bulk Operations: Import or export multiple work items efficiently.
Troubleshooting
Common Issues
-
Authentication Failed:
- Verify your Personal Access Token is correct and hasn't expired.
- Ensure the PAT has the required scopes (Work Items: Read & write).
-
Organization/Project Not Found:
- Double-check the organization and project names for exact spelling and case sensitivity.
- Ensure you have access to the specified project.
-
Work Item Creation Failed:
- Verify your PAT has write permissions for work items.
- Check if the work item types exist in your Azure DevOps project.
-
Hierarchy Issues:
- Ensure your Azure DevOps project supports the work item hierarchy (Feature → Platform Feature → User Story).
- Verify the work item type mappings are correct for your project.
Security Best Practices
- Token Management: Regularly rotate your Personal Access Tokens.
- Minimal Permissions: Only grant the minimum required scopes to your PAT.
- Secure Storage: Store your PAT securely and never commit it to version control.
- Monitor Usage: Regularly review PAT usage in Azure DevOps security settings.
By following these steps, you can successfully integrate Specifai with Azure DevOps for seamless work item management and synchronization.