Solution Integrations Setup Guide
Connect powerful external tools and services to enhance your Specifai workflows.
🎯 JIRA Integration
Integrate JIRA to transform Specifai-generated requirements into actionable JIRA tickets, streamlining your development pipeline.
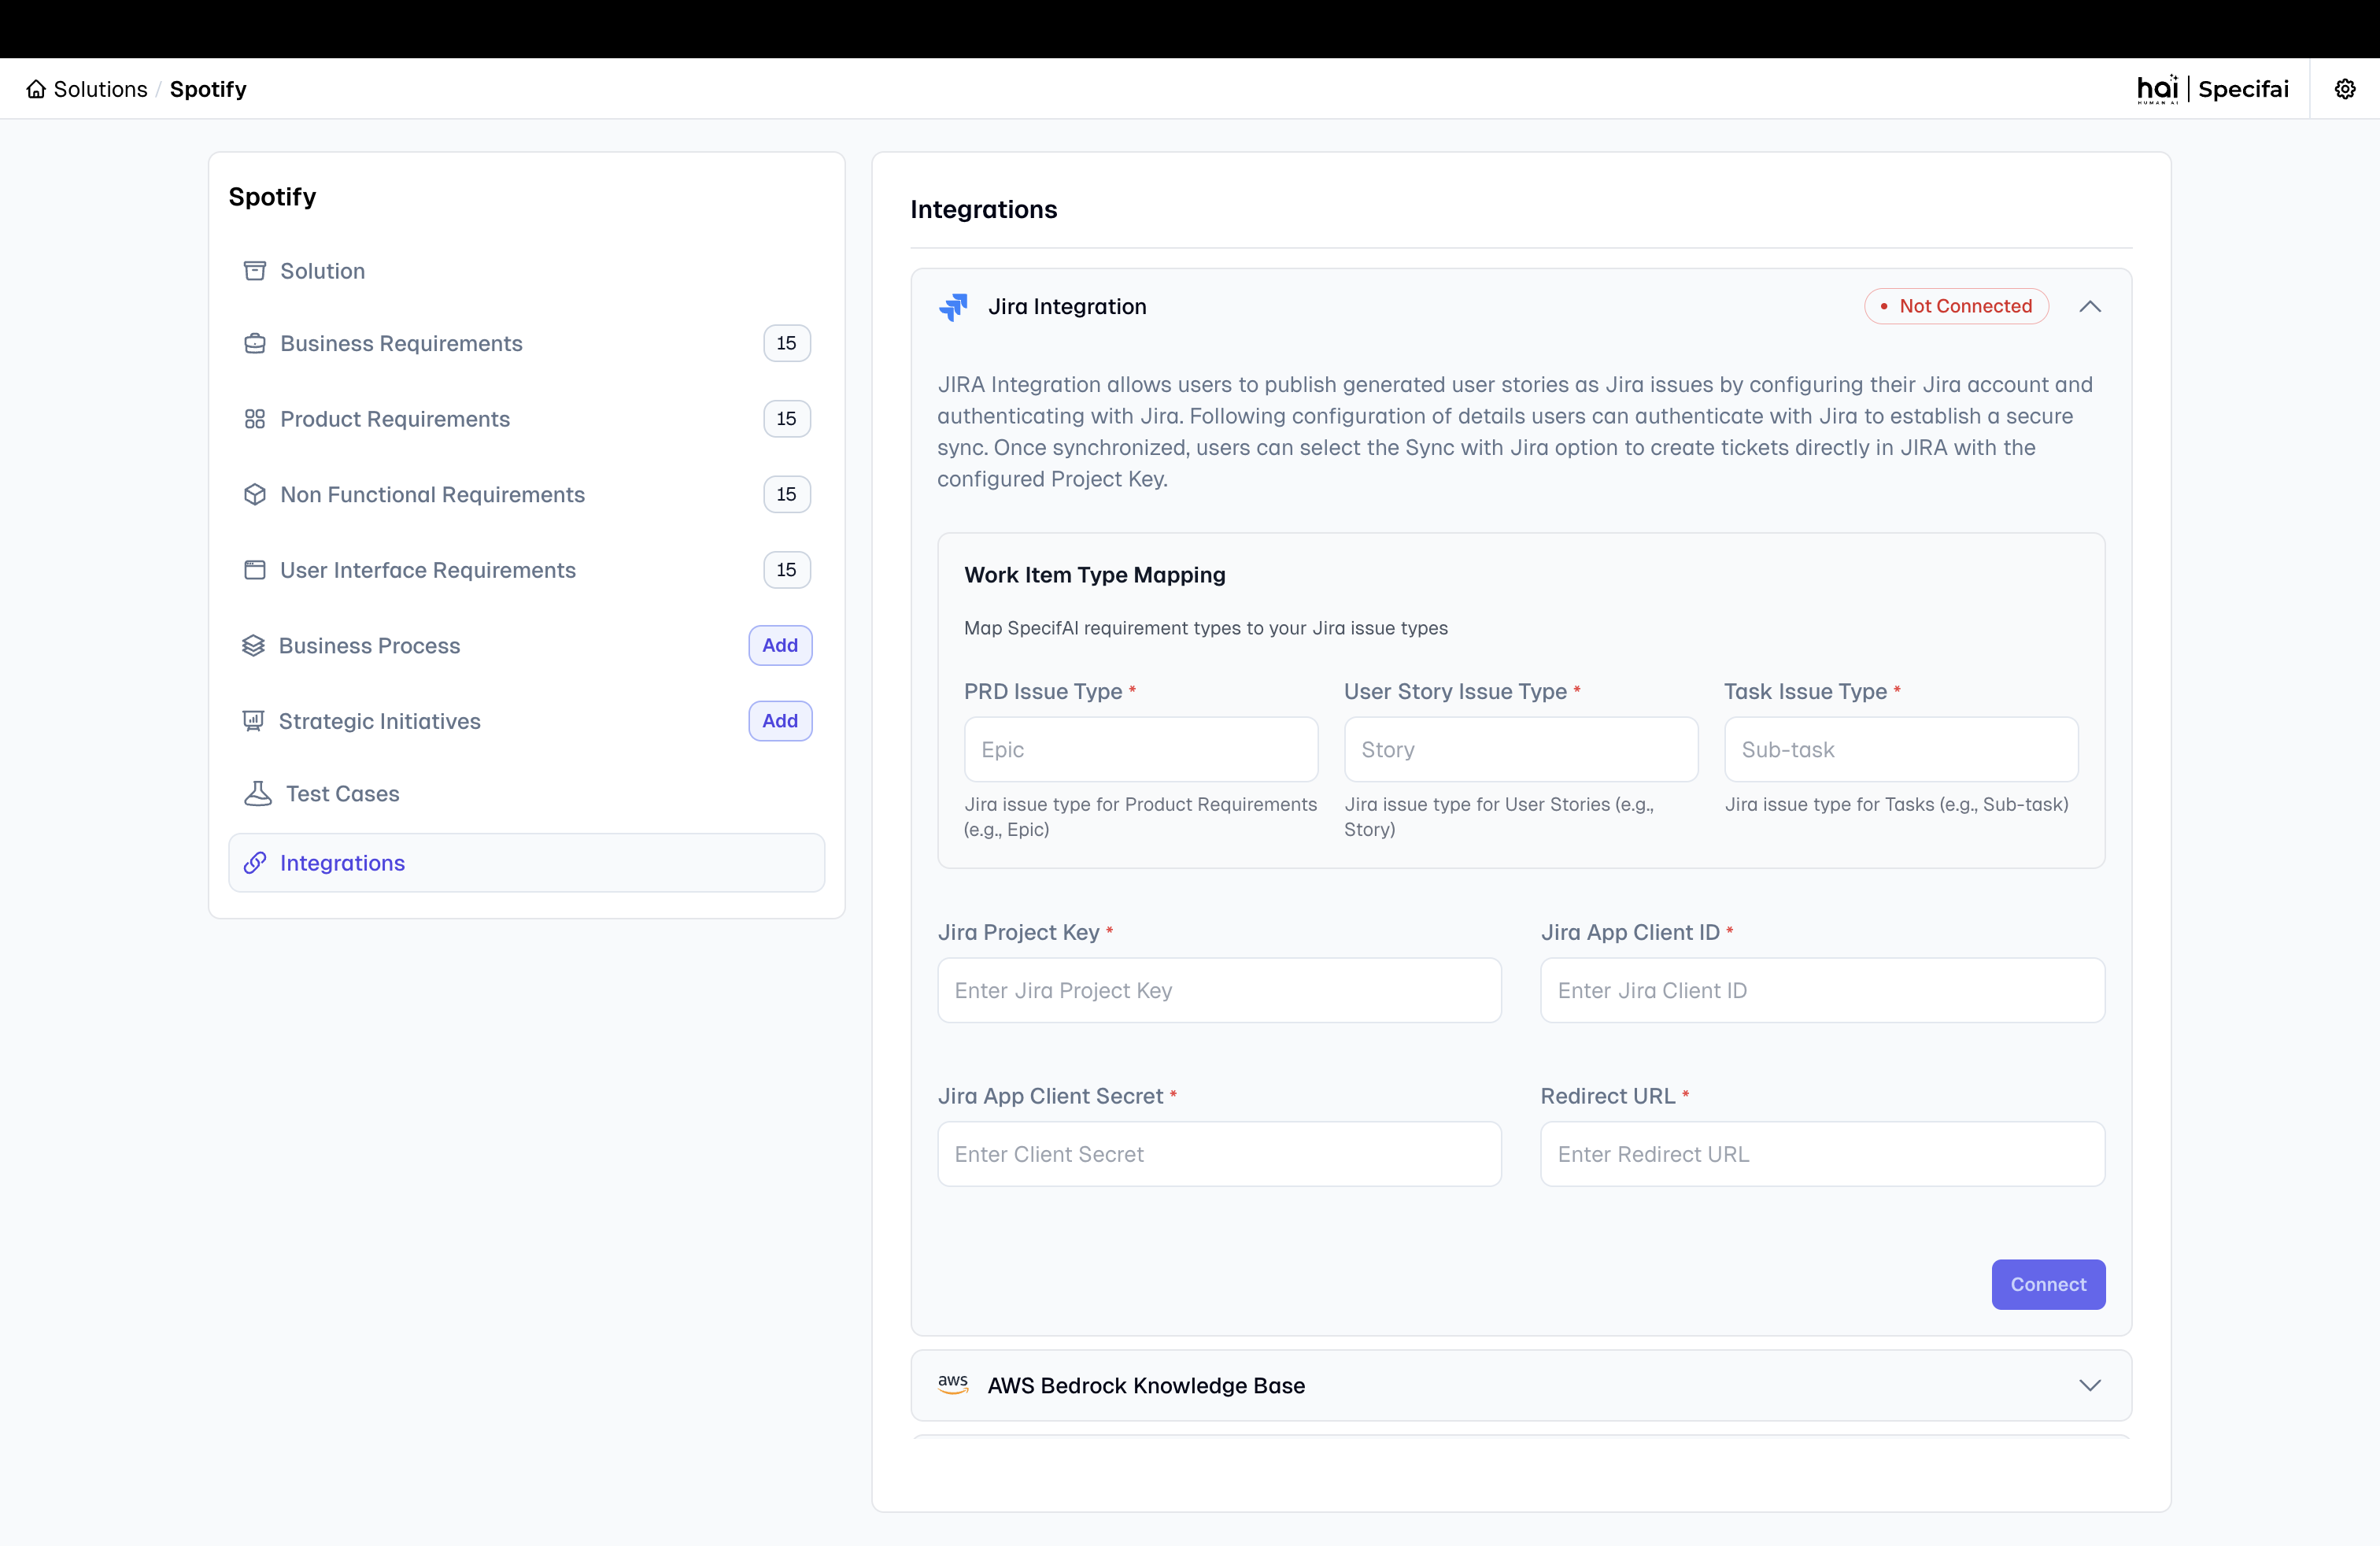 Manage JIRA integrations within Specifai
✨ Features and Benefits
- Bidirectional Synchronization: Pull issues from Jira into Specifai or push Specifai requirements to Jira.
- Automated Ticket Creation: Convert PRDs, User Stories, and Tasks into JIRA epics, stories, and tasks, maintaining hierarchy.
- Bulk Operations: Import or export multiple prds, stories and tasks efficiently, maintaining parent-child relationships.
- Seamless Synchronization: Create and update JIRA tickets based on Specifai changes, ensuring data consistency.
⚡ Quick Start Guide
-
Prerequisites: You'll need an active JIRA instance, administrator access (or relevant permissions) to create JIRA OAuth apps, and the Specifai desktop application.
-
Detailed Setup: For comprehensive OAuth configuration and permissions, refer to our Jira OAuth 2.0 Integration Guide.
-
Sync to JIRA:
-
From the PRD page in Specifai, select your PRD and go to its Stories tab.
-
Click Export and choose Sync to JIRA.
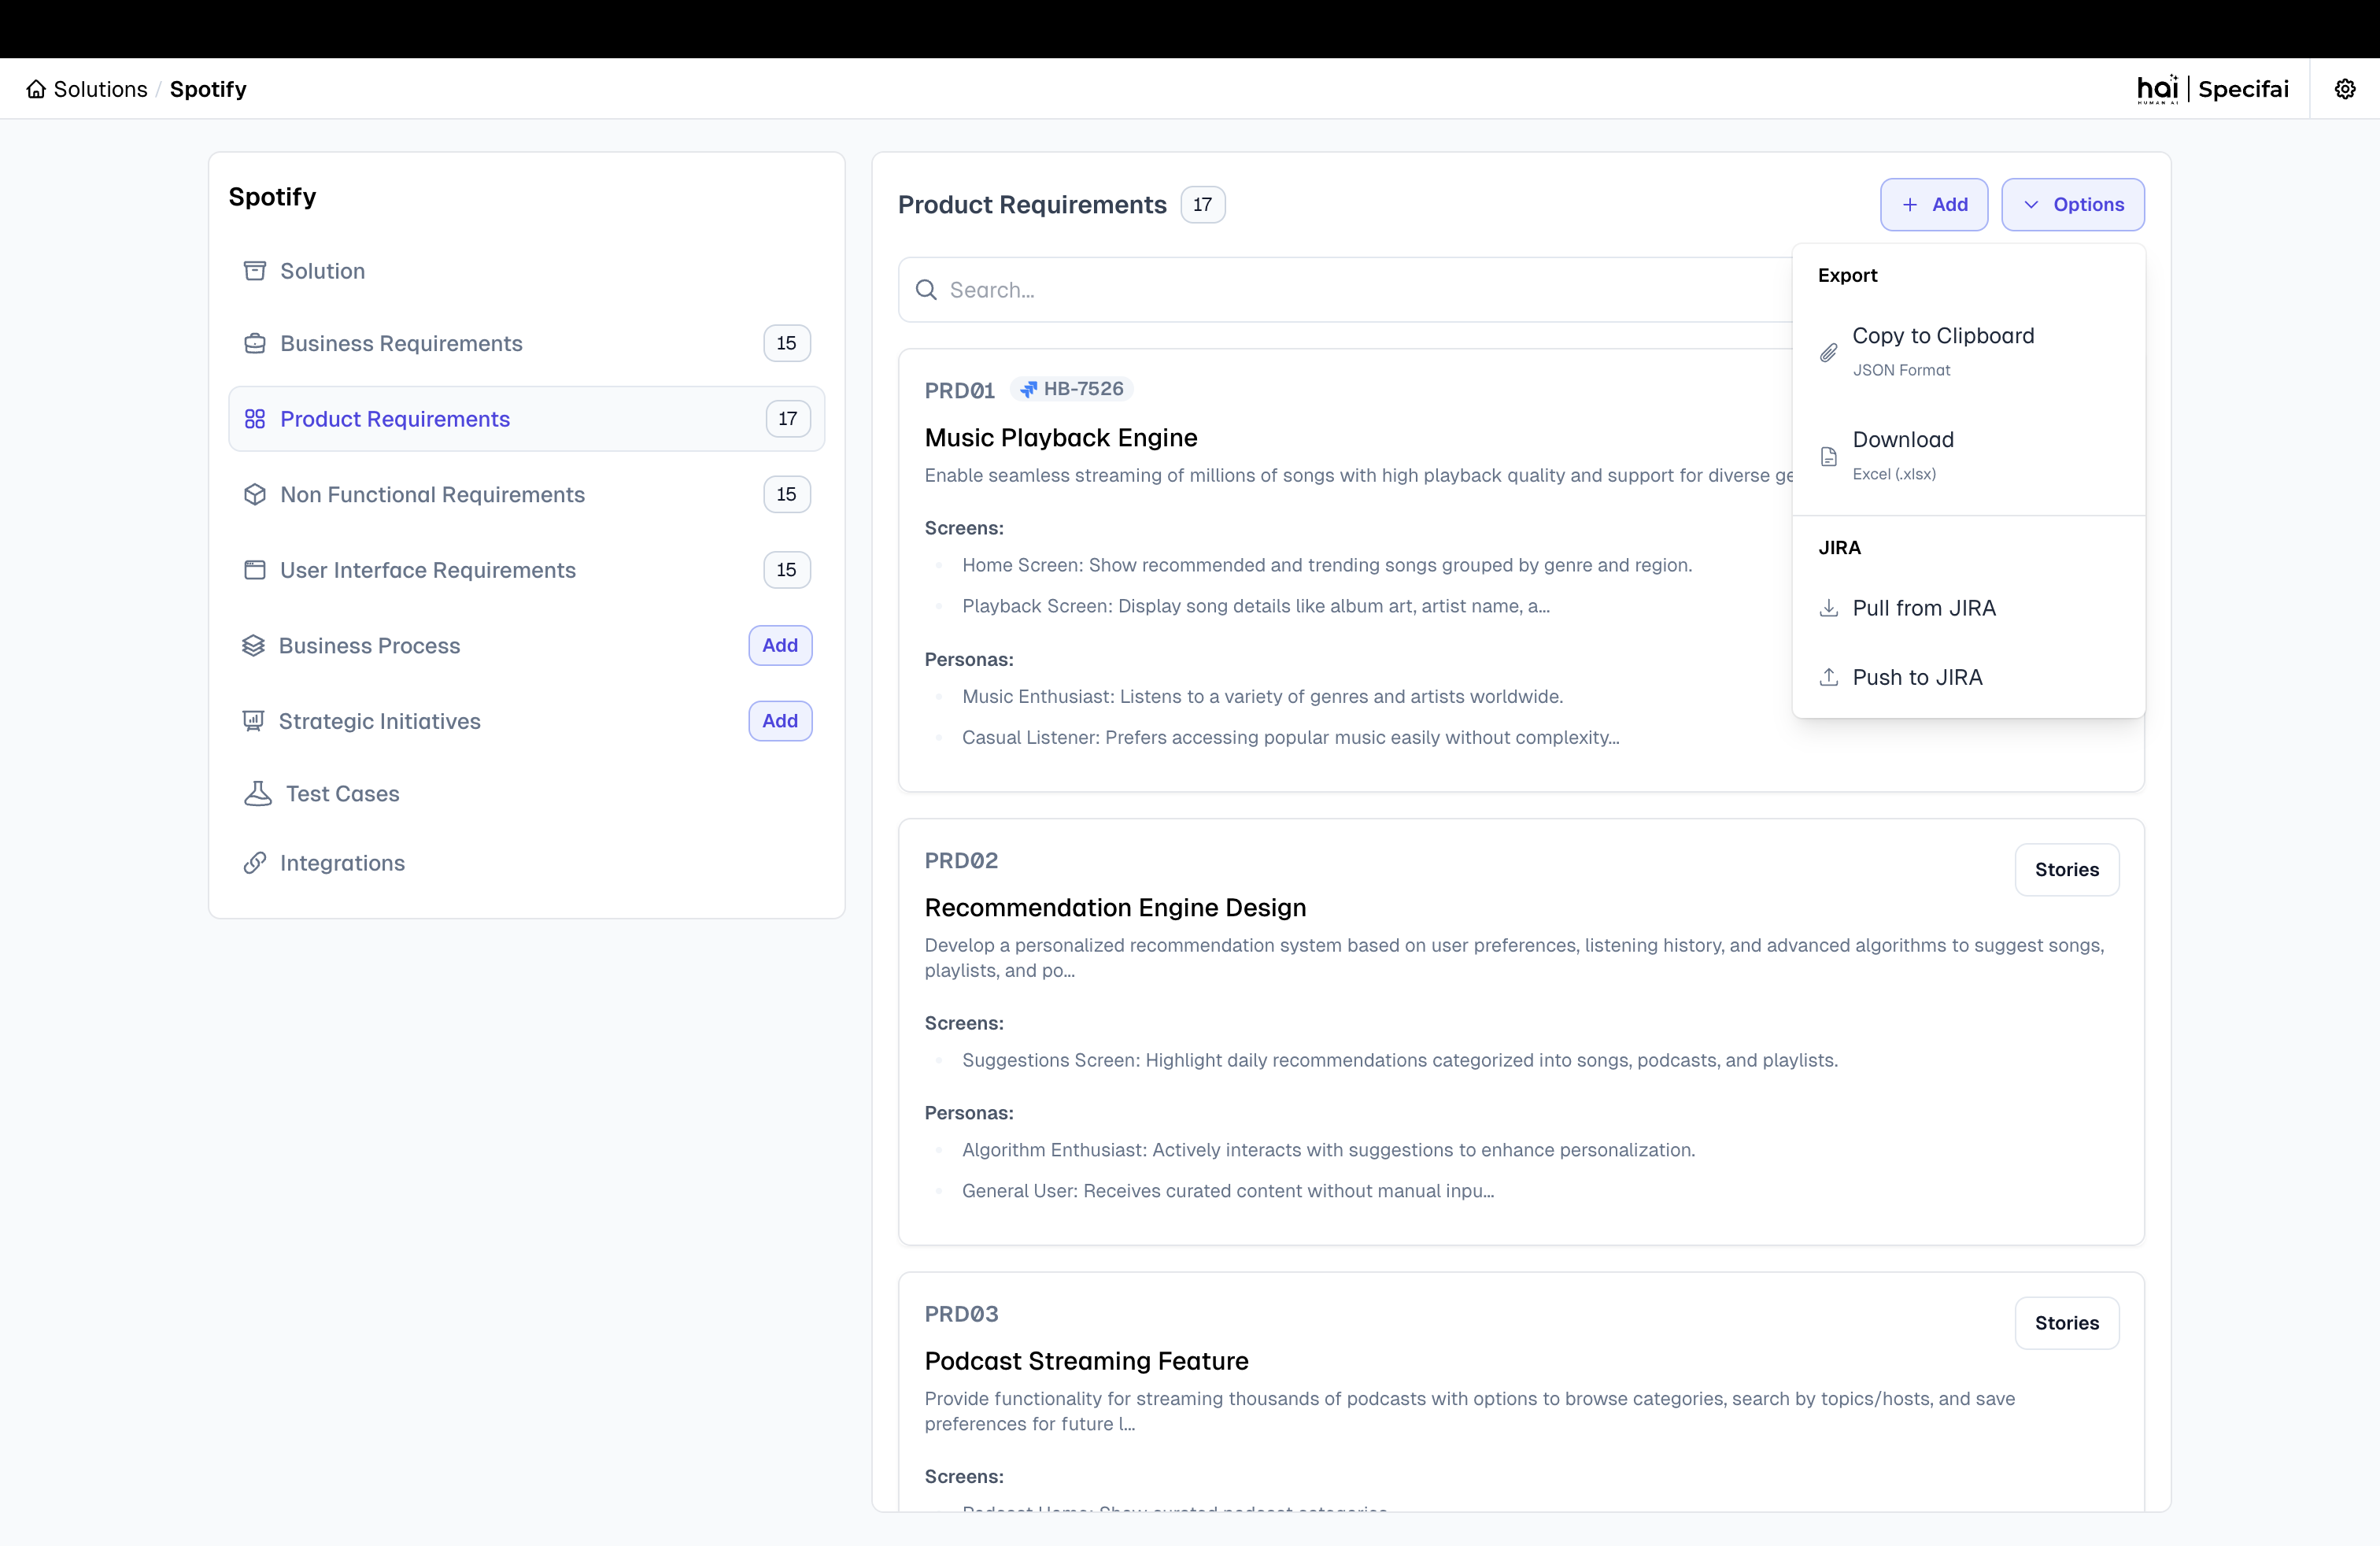 Initiate sync to JIRA from the Export menu
 -
Tickets are automatically created in JIRA with these mappings:
- Epic: PRD
- Story: User Story
- Task: Task
-
You'll receive a notification upon sync completion. JIRA Ticket IDs are displayed in Specifai next to corresponding requirements for easy reference and search.
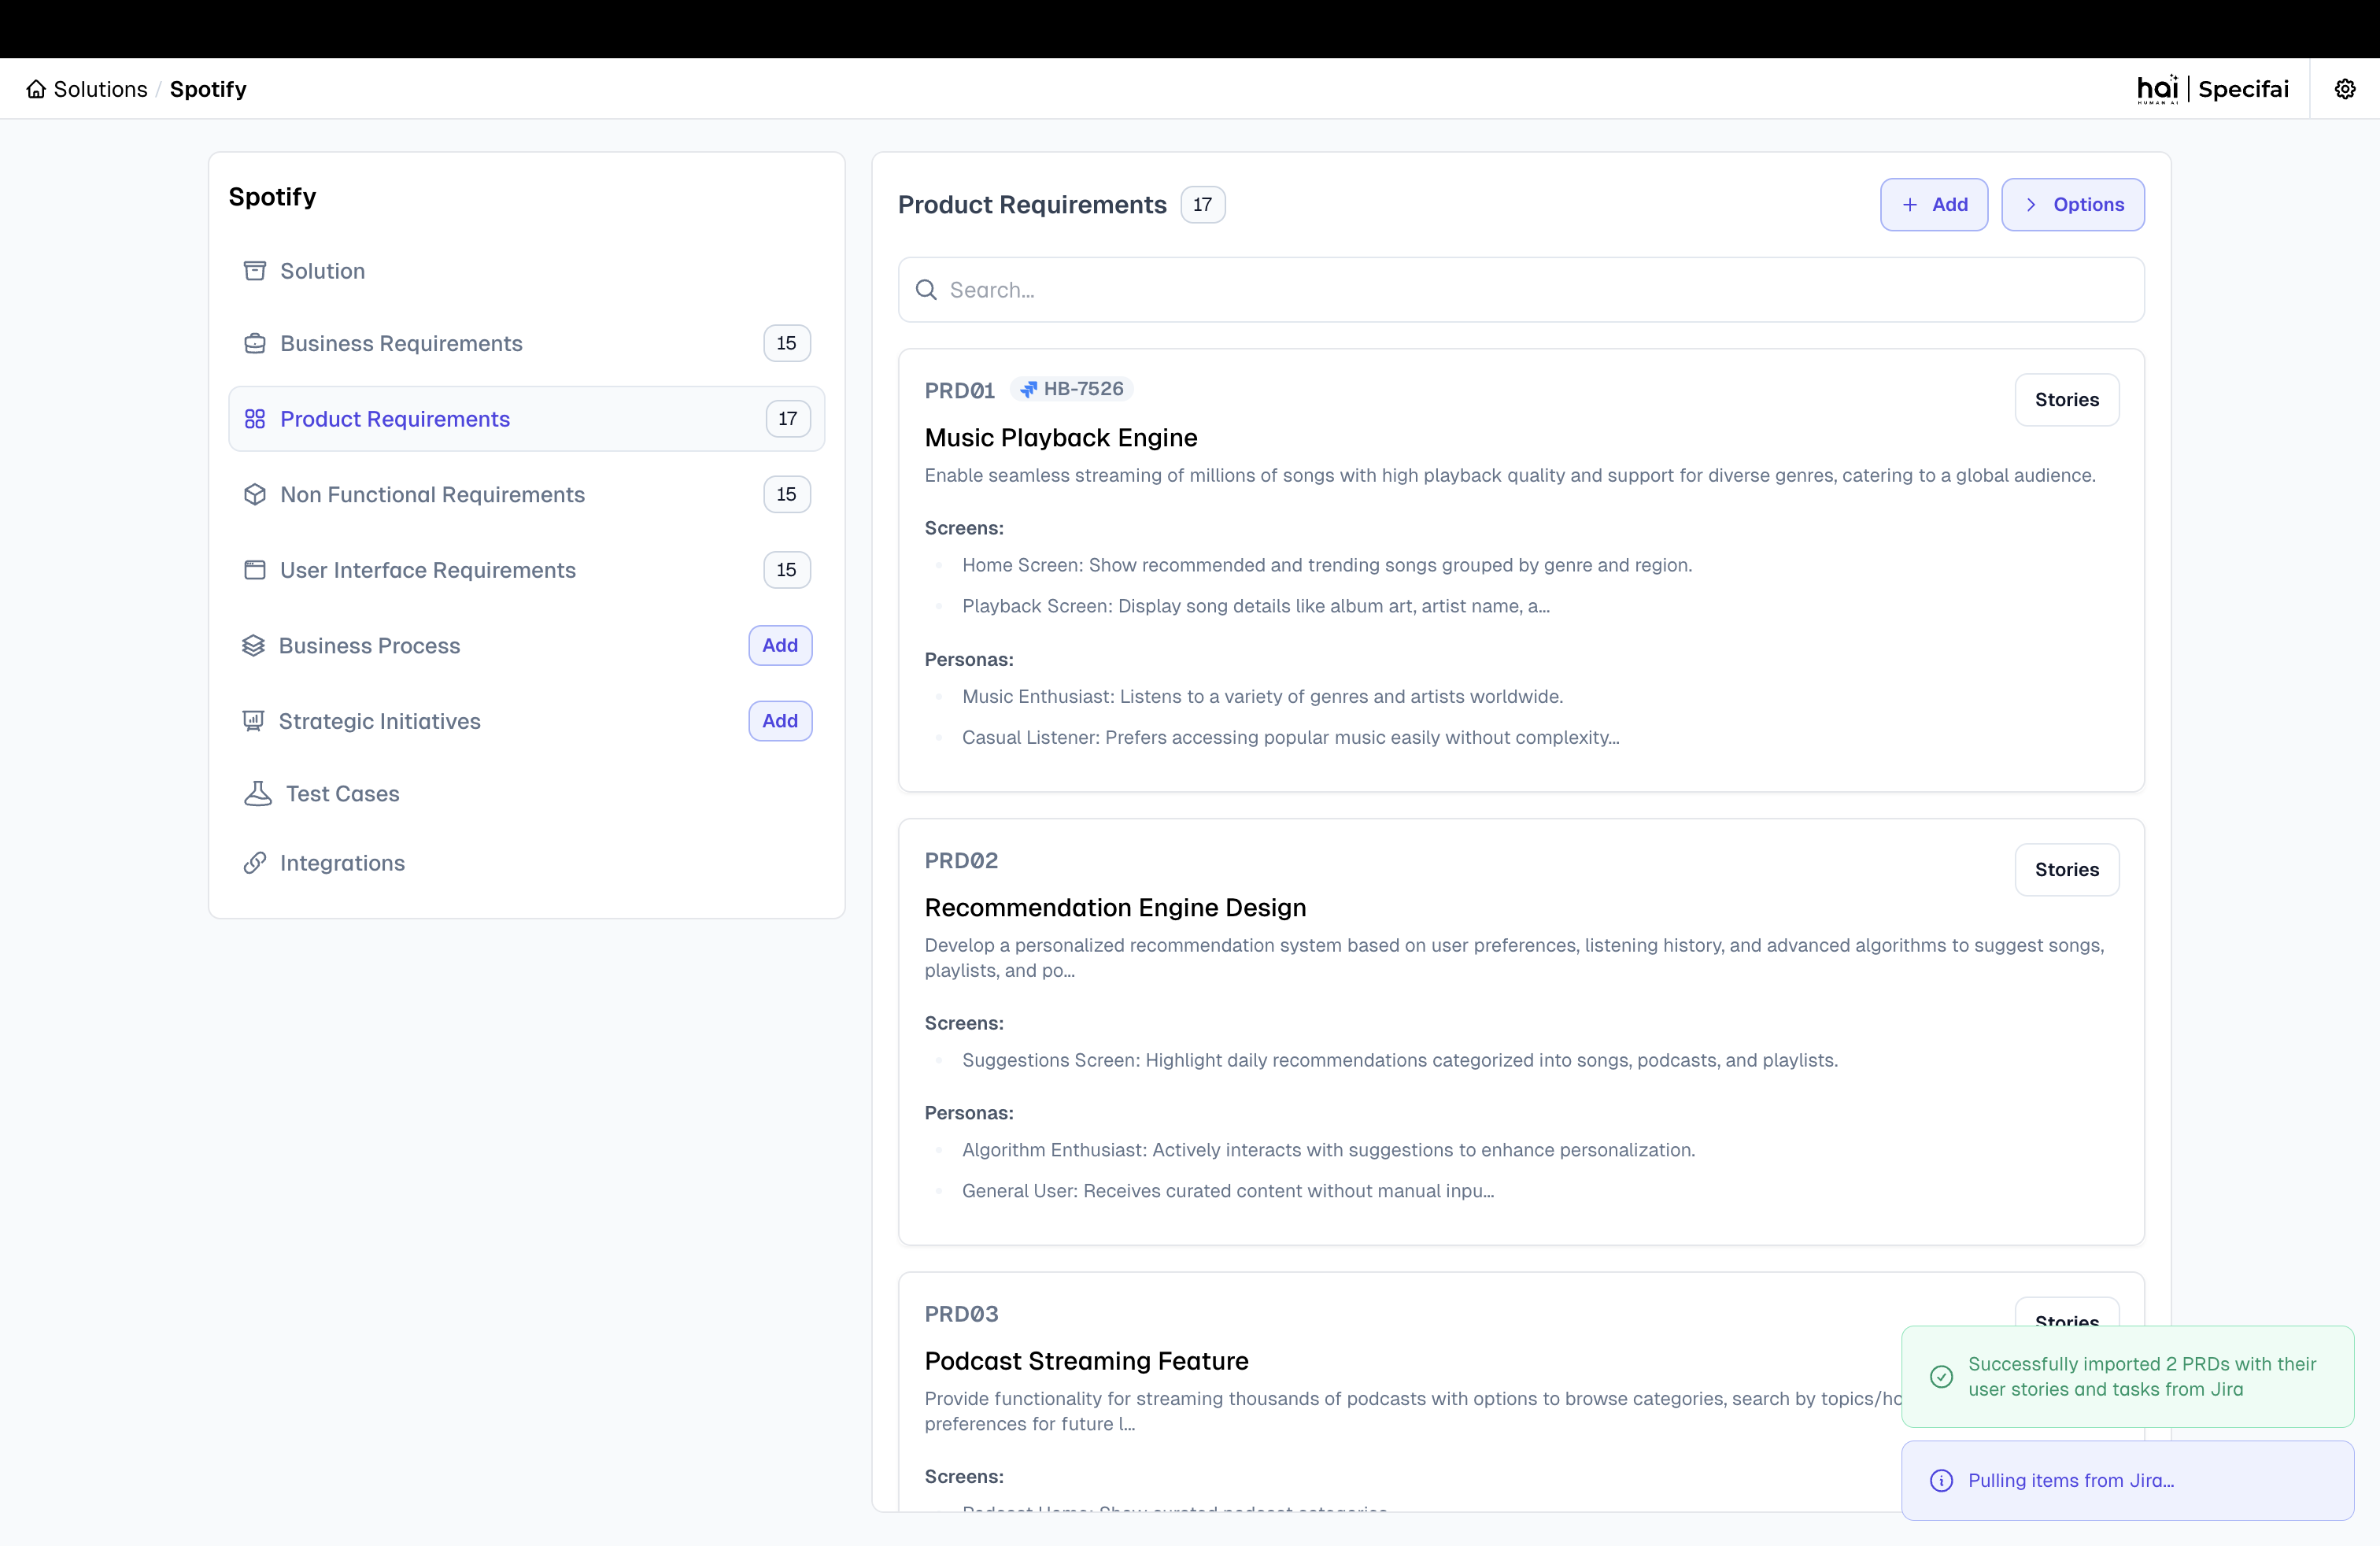 Synced JIRA tickets displayed in Specifai
-
🔷 Azure DevOps Integration
Integrate Azure DevOps to synchronize Specifai-generated requirements with your ADO work items, enabling seamless project management across platforms.
 Manage Azure DevOps integrations within Specifai
✨ Features and Benefits
- Hierarchical Work Item Management: Support for Features → Platform Features → User Stories mapping that aligns with ADO's structure.
- Bidirectional Synchronization: Pull work items from ADO into Specifai or push Specifai requirements to ADO.
- Flexible Mapping: Configure work item types to match your ADO project structure (PRD→Feature, User Story→Platform Feature, Task→User Story).
- Bulk Operations: Import or export multiple work items efficiently, maintaining parent-child relationships.
- Personal Access Token Authentication: Secure authentication using Azure DevOps PATs with granular permission control.
⚡ Quick Start Guide
-
Prerequisites: You'll need an active Azure DevOps organization, project access with work item permissions, and the Specifai desktop application.
-
Detailed Setup: For comprehensive PAT creation and configuration, refer to our Azure DevOps Integration Guide.
-
Pull from Azure DevOps:
- Navigate to your solution's integration page in Specifai.
- Click Sync with Azure DevOps to access the ADO integration modal.
- Select the Features, Platform Features, and User Stories you want to import.
- Click Pull from ADO to import selected items into Specifai as PRDs, User Stories, and Tasks.
-
Push to Azure DevOps:
- From your solution, select the PRDs, User Stories, and Tasks you want to export.
- Click Push to ADO to create corresponding work items in Azure DevOps.
- The system maintains hierarchical relationships (PRD→Feature, User Story→Platform Feature, Task→User Story).
-
Successful Integration:
- Upon successful sync, you'll see confirmation messages and ADO work item IDs displayed in Specifai.
- Work items maintain bidirectional references for easy tracking and updates.
 Successfully connected Azure DevOps integration
🚀 AWS Bedrock Knowledge Base Direct Solution Integration
Connect your enterprise knowledge base to Specifai's AI chat, enhancing suggestions and enabling context-aware requirement generation for all document types.
✨ Benefits & Features
- Enhanced Chat Suggestions: Leverage organizational knowledge for insightful AI chat assistance.
- Context-Aware Generation: Create precise requirements using context from your knowledge base (e.g., domain info).
- Historical Data Integration: Integrate past data (e.g., previous requirements) for informed creation.
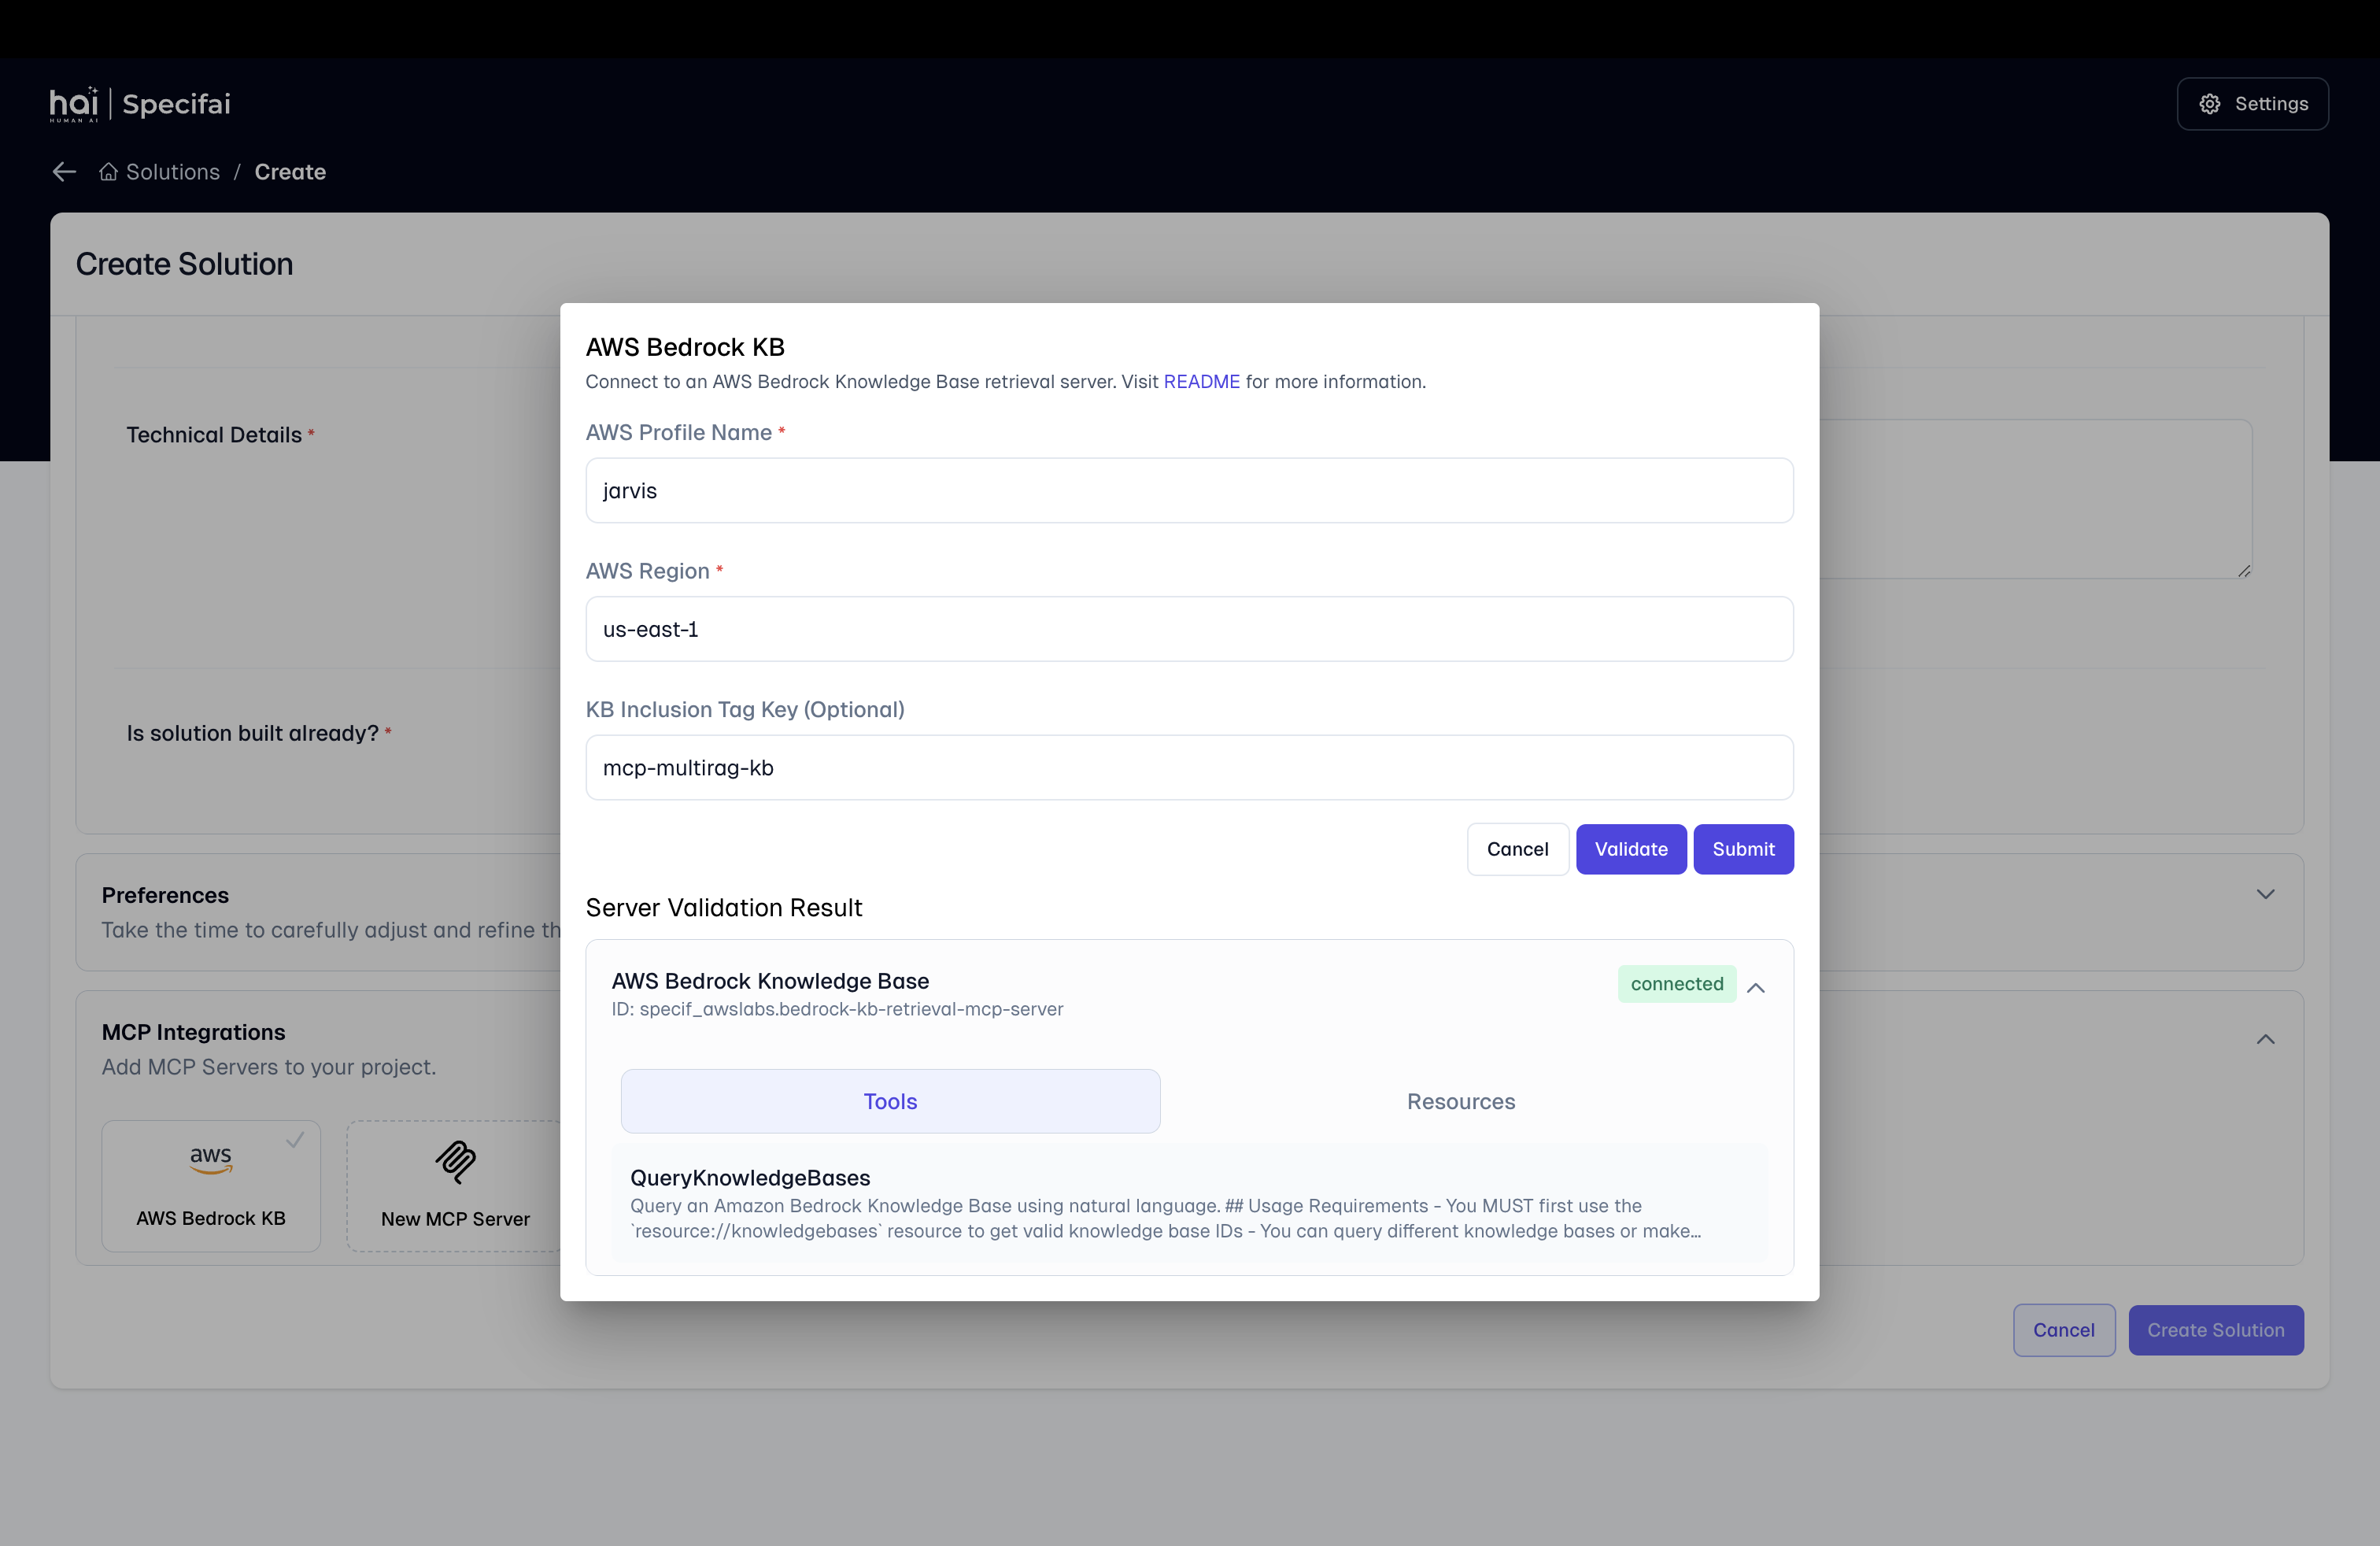
🛠 Setup Instructions
-
Prerequisites: You'll need an AWS Knowledge Base containing relevant context (domain info, past requirements) and an IAM key with
bedrock:ListKnowledgeBases,bedrock:GetKnowledgeBase,bedrock:Retrievepermissions. Configure your AWS Bedrock Knowledge Base connection
 -
Existing Bedrock LLM Config (Optional): If your existing AWS Bedrock LLM configuration has the necessary permissions, simply check "Use existing Bedrock configuration from LLM settings".
-
Direct API Key Config: Alternatively, configure AWS API Keys directly using the provided form fields.
-
Knowledge Base ID: Accurately enter your AWS Knowledge Base ID.
-
Connect: Click "Connect" to establish the link between Specifai and your AWS Knowledge Base.
✅ Verification Steps
- Verify KB Access: Confirm Specifai can access and retrieve data from your AWS KB.
- Test Chat Suggestions: Verify AI chat suggestions are enhanced and relevant, drawing from the KB.
🧠 Model Context Protocol (MCP) Integration
MCP is Specifai's extensible framework for integrating external tools and knowledge bases. It enhances AI relevance and accuracy for all generated requirements.
Supercharge your development workflow with powerful tools and knowledge bases through the flexible Model Context Protocol (MCP)
🛠 Built-in MCP Server Integration
Specifai natively supports AWS Bedrock Knowledge Base (KB) as a built-in MCP server, leveraging your organizational data for requirements. Configuration is straightforward via the UI. For detailed setup, refer to our AWS Bedrock KB Configuration Guide.
 Interface for AWS Bedrock KB configuration
🛠 Custom MCP Server Integration
Beyond built-in options, Specifai enables custom MCP server integration, extending functionality with proprietary data or specialized applications (e.g., a file system MCP server).
Configuring Custom MCP Servers
-
Navigate to MCP Integrations: Access MCP Integrations during Solution Creation or in Settings > Integrations.
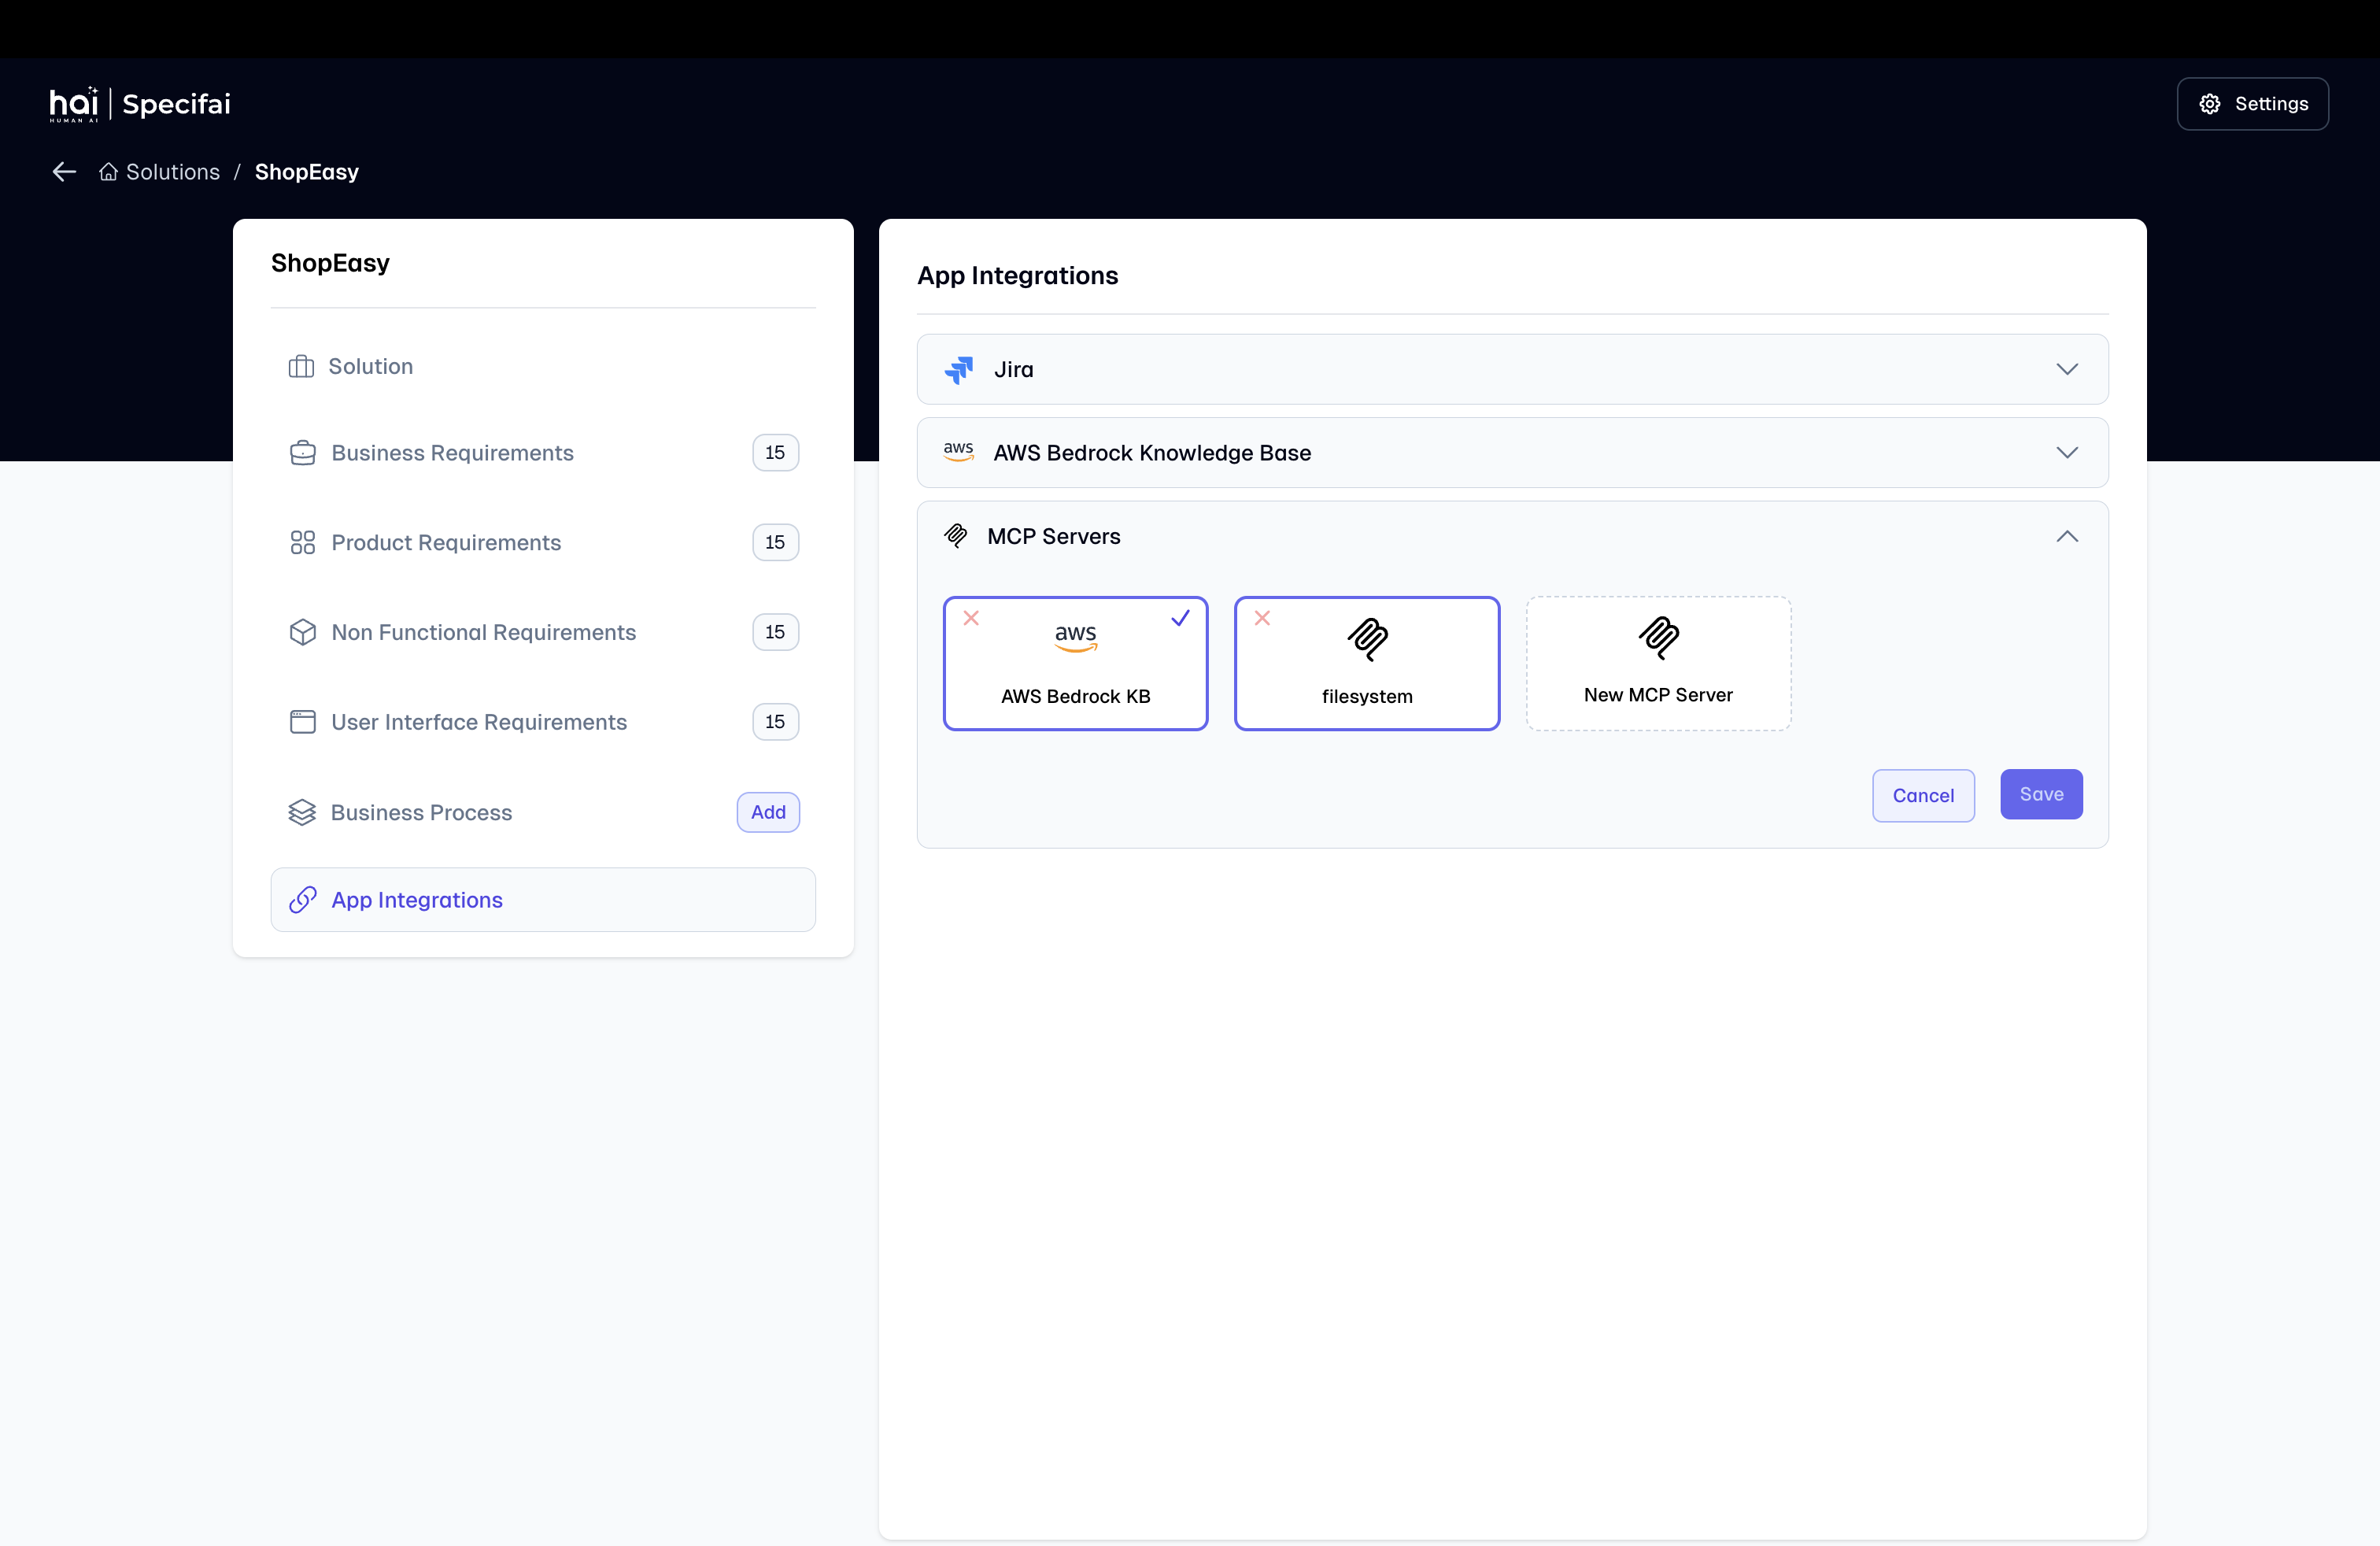 Access MCP server integrations during solution creation
Manage MCP server integrations for an existing solution
-
Add New MCP Server: From the "MCP Integrations" tab, select "New MCP Server".
-
Provide Details:
- Server ID: A unique identifier (e.g.,
filesystem). - Server Configuration (JSON): Define communication parameters.
{
  "command": "npm",
  "transportType": "stdio",
  "args": ["run", "@modelcontextprotocol/server-filesystem", "/your/path/to/Mcp"],
  "id": "filesystem"
}
 Interface for configuring custom MCP server integrations
 - Server ID: A unique identifier (e.g.,
-
Validate & Submit: Click "Validate" to confirm connectivity, then "Submit" to save.
-
Save Integration: Click "Save" to finalize the integration.
🌐 Centralized Integration Management
All MCP integrations are managed from a single Integrations page, providing a unified hub to add, configure, monitor, and remove servers.
Manage all MCP integrations from a single, centralized location
💡 How MCP Enhances Requirement Workflows
MCP tools are dynamically invoked during the research step within Specifai's agentic workflows, gathering crucial information that directly impacts output quality.
MCP specifically enhances:
- Solution Generation: Improves BRD, PRD, NFR, and UIR accuracy by providing contextual information.
- User Story & Task Generation: Contributes to the research phase for relevant and actionable User Stories and Tasks.
- AI Chat Assistance: Refines AI chat suggestions with real-time contextual information.
Next Steps
Now that you've set up your integrations, you're ready to enhance your Specifai experience! Explore the following:
- Advanced Features Guide for deeper insights into Specifai's capabilities.
- Troubleshooting Guide for common issues and solutions.
Need more help?
- Contact us at hai-feedback@presidio.com
- Visit our GitHub Issues page.
Specifai is continuously evolving—check our release notes for updates!